Plan Checklists
Edit Plan
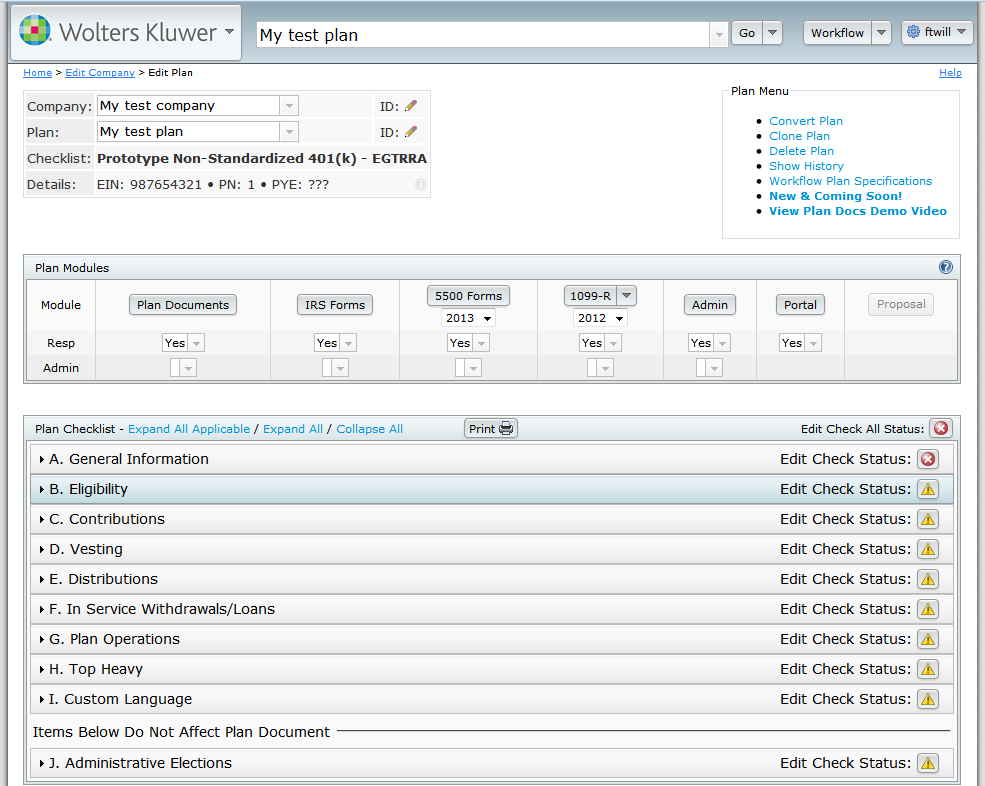
The Edit Plan screen is the home page for each plan and enables you to access each available module for the plan, such as Admin, 5500s, Portal, etc., as well as edit data about the plan itself. In the top left, you will see the basic information about the plan, including:
- Company Name
- Plan Name
- Checklist Type
- Employer Identification Number, Plan Number, and Plan Year End (EIN, PN, and PYE respectively)
- Company ID* - a Unique ID for the company assigned by an Admin user
- Plan ID* - a Unique ID for a plan assigned by an Admin user
*If you are an Admin user, a
 icon will appear next to the field. Click the icon to edit the field, and the field will automatically save. Click the
  icon to discard any changes you've entered.
This information is displayed on the home screen for all modules and the top right will feature functions for each module. For example, in the Plan Document module, the Plan Document Menu allows users to choose between Word and PDF output formats, Print IRS Letters for the plan, etc.
Using the drop-down options under Company Name and Plan Name, you can quickly navigate between plans and companies you would like to work with. Selecting a different Company Name will direct you to the Edit Company screen with that company selected; selecting a different Plan Name will not change which screen you are currently viewing but will change which plan you have selected
Checklist Type
All plans on ftwilliam.com are associated with a checklist type of one of the following depending on the document packages you have purchased.
-
Retirement Plan Documents:
- Prototype Non-Standard 401(k) - PPA
- Prototype Non-Standard 401(k) (Answers Only) - PPA
- Prototype Non-Standardized Money Purchase
- Prototype Non-Standardized Target Benefit
- Prototype Standardized 401(k) - PPA
- Prototype Standardized 401(k) (Answers Only) - PPA
- Prototype Standardized Money Purchase
- Volume Submitter 401(k) Prototype Format - PPA
- Volume Submitter 401(k) Prototype Format (Answers Only)- PPA
- Volume Submitter 401(k) - PPA
- Volume Submitter Profit Sharing - PPA
- Volume Submitter Money Purchase
- Defined Benefit Pension Plan (Proto Format)
- Defined Benefit Pension Plan (ID Format)
- Cash Balance Plan (Proto Format)
- Cash Balance Plan (ID Format)
- Employee Stock Ownership Plan
- Employee Stock Ownership Plan 401(k)
- Section 403(b) Plan (Full Scope)
- Section 403(b) Plan (Limited Scope)
- Welfare Plan Documents:
- Cafeteria Plan
- Premium Only Plan
- Health Reimbursement Arrangement
- Trans Spend Acct
- Wrap Plan
- Non-Qualified Plan Documents:
- Section 457(b) Plan
- Section 409A Plan
- Misc (1099, 5500 or Admin Software)
Note: If you have not purchased a plan document module you will only have access to the 'Misc' plan checklist type. Plans using the Misc. checklist have access to the General Information section on the Edit Plan screen. Plans using the Misc. checklist can still be used for all modules except the Plan Documents module.
Converting Checklist Types
You may change the Document Checklist Type for a plan using the Convert Plan function in the Plan Menu in the top right. You can change between different retirement checklist types, or between welfare checklist types, but if you need to convert a plan checklist from a retirement plan to a welfare plan, or the other way around, you must first convert the plan to a 'Misc' type, then complete the conversion.
Designated Admin users may Revert converting a plan from the Show History menu as well, but you cannot revert changes made to the plan prior to conversion without converting the plan checklist type back, since the Revert function rolls back the Plan Checklist to a prior state.
Print Checklist
You can also print the selected checklist and responses to a .rtf file at the top of the Plan Checklist section by clicking the Print icon. Per plan document customers will not be billed for printing checklists.
Editing the Checklist
Each checklist type features different sections, and fields though you can edit them all the same. To display the content of any section, click anywhere on the section next to the section letter index A-J, and all the relevant checklist options will appear for the selected plan's Checklist Type.
The sections listed will vary depend on the checklist the plan is using. To view the checklist questions in each section, you can click Expand All, Expand All Applicable, or click the section header itself. Expand All will display all checklist questions even if they are disabled from the response of another checklist question. For example, if question 4b for a Prototype Non-Standardized 401(k) plan is 'No', questions 4ci, and 4cii will still be listed, but will appear grayed out and disabled (unable to enter text, or select an option).

Expand All Applicable will still list the blank entry, but not display the question or entry field:

You can also expand each section one at a time by clicking the section name, as well as each sub-section.
After making an entry in a text or date field, you do not need to click any buttons to submit; when you move your cursor the field will automatically save: clicking elsewhere on the page, or pressing the Tab key, for example. When the document checklist has been successfully updated, you will see a confirmation icon ( ) next to the updated field.
If the field fails to update, you will see the failed upload icon ( ). If you cannot update the text field, try refreshing the page to verify you are still logged in, and that you currently have an internet connection.
ZZZ - Default Plans
When you add a new plan any necessary plan specifications are automatically populated using defaults set in special plans called 'ZZZ-Defaults' (unless you added the plan using 55Autofill or by cloning a plan). Before adding new plans, you may want to start by opening the default company plans and updating the default plan specifications. 'ZZZ-Default' settings do not affect existing plans, and are only used when creating a new plan. All 'ZZZ-Defaults' are unique to each plan type: for example, the defaults for a 401(k) Prototype Non-Standardized plan will not affect new Volume Submitter 401(k) plans.
Designated Admin users and the Master user can edit ZZZ-Defaults by clicking the Wolters Kluwer logo button, selecting Administrative Tasks, then clicking ZZZ-Defaults under Defaults . You can edit the default Plan Checklists just like other plans.
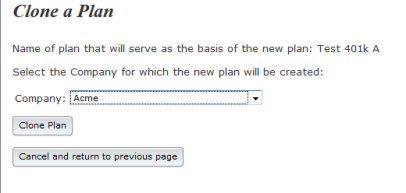
You may also copy the checklist answers to a new plan in any company instead of using ZZZ-Defaults by clicking on the Clone Me link next to the Checklist name.
Cloning a plan will copy the checklist answers of the selected plan to a new plan for an existing company that you have created on the system. If you would like to add the plan to a new Company, you will need to create the company prior to cloning the plan. You will not need to create a new plan, which will be done by the Clone Me feature. To clone a plan, simply navigate to the Edit Plan screen by either selecting the plan in the Navigation Bar, or from the Home screen. In the Plan Menu click Clone Plan, then in the next screen, select a company to associate with the cloned plan.